Before you start: this is a sim checklist, not an Airbus manual.
Plenty of simmers tailor their checklists to suit how they fly, and that's fine. Ours has one job: get the Fenix A320 from cold and dark into the air, properly and in a sensible order, flying single-pilot. It's built on standard A320 flows, but it isn't the Airbus FCOM or an airline's SOP, so don't read too much into the exact wording or order. If something works for you in a different place, move it.
The startup splits into nine stages. Each one has its checklist exactly as it appears in the app, then the bits worth knowing.
- Pre-Flight
- Power and align
- Overhead set-up
- Flight plan & clearance
- System checks
- APU start
- The MCDU
- Before Start
- Push & engine start
Pre-Flight: make the flight deck safe
Before anything gets power, check every lever and switch that could move something or surprise you. The spoilers, flaps and gear lever must match what the aircraft is actually doing, the engine masters must be off, and the thrust levers at idle. It takes a minute, and it stops the classic "why are my flaps moving?" moment when the hydraulics come alive.
- PARKING BRAKEON
- WEATHER RADAROFF
- PREDICTIVE WINDSHEAROFF
- SPOILERSDISARMED & RETRACTED
- FLAPSRETRACTED
- ENGINE MODE SELECTORNORM
- ENGINE MASTERSOFF
- THRUST LEVERSIDLE
- TRANSPONDER MODESTBY
- ANTI-SKIDON
- LANDING GEAR LEVERDOWN
- WIPERSOFF
- GPU (EFB)CONNECTED
Fenix tip: the ground power unit (GPU) isn't connected by default. Open the Fenix app on the EFB, go to Ground Services and switch on GPU. With GSX installed and Auto Connect GPU on, it may already be connected. Without it, the EXT PWR button in the next stage has nothing to switch on.
Power up and start the alignment
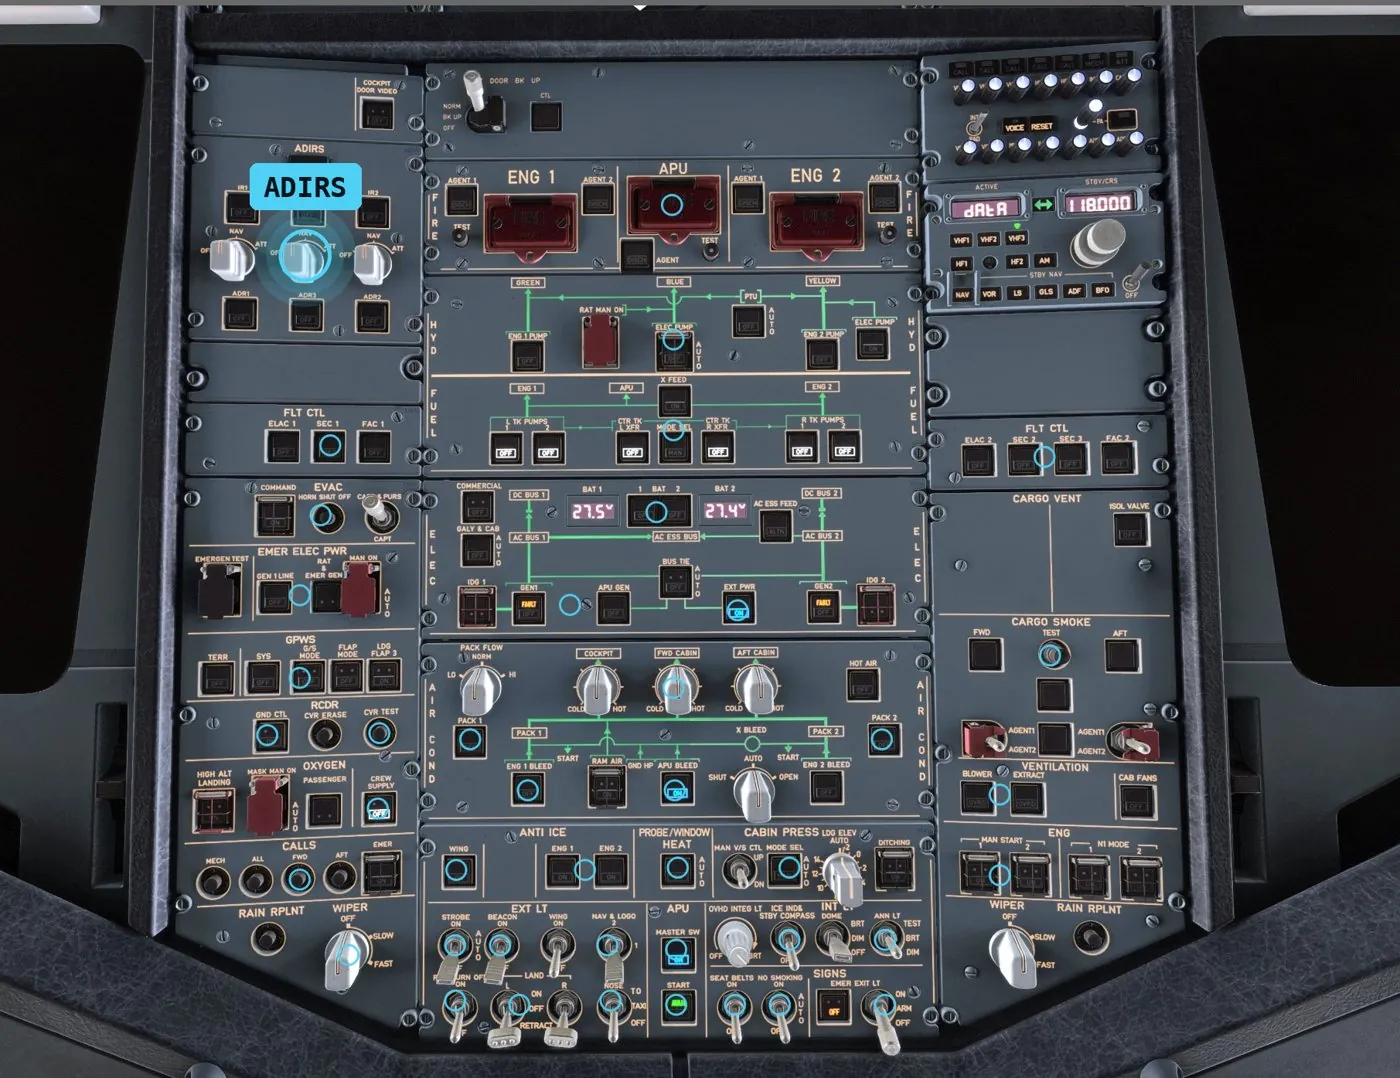
Batteries on, then external power. The flight deck wakes up and the displays come on. Do the ADIRS straight away: the three inertial reference units need a few minutes, sitting still, to work out where the aircraft is. Starting them now means they're aligning while you do everything else.
- BATTERY 1 & 2ON
- EXTERNAL POWERON
- ADIRS (1, 2 & 3)NAV
Overhead set-up and tests
Next, the rest of the overhead. The checklist groups these by job rather than by where they sit, so you'll move around the panel a bit: exterior lights and cabin signs first (bottom centre of the overhead), then crew oxygen supply, then the tests. Those are the cockpit voice recorder, the APU and engine fire tests, and the annunciator light test, which lights every bulb so you can spot a dead one. Not sure where a switch is? The locate icon in the app shows you.
Seat belt signs stay OFF for now. Passengers board while you refuel, and they need to be able to leave quickly if anything goes wrong with the fuel. They go ON in Before Start, once fuelling and boarding are finished.
- NAV & LOGO LIGHTSON
- SEATBELT SIGNSOFF
- NO SMOKING SIGNSON/AUTO
- EMERGENCY LIGHTSARM
- CREW SUPPLYON
- GROUND CONTROLON
- CVR TESTCHECK
- APU & ENG FIRE TESTSPERFORM
- ANNUNCIATOR LIGHTSTEST
- PROBE/WINDOW HEATAUTO
- ANTI-ICEOFF
- AIR CONDITIONINGAS REQUIRED
- COCKPIT LIGHTSAS REQUIRED
Fire tests: press and hold each test button until the warnings, the red lights and the chime all come up, then release. If something stays dark, that's a fault you'd want to know about now, not after takeoff.
Flight plan, fuel and clearance
Load your SimBrief plan into the EFB (Fenix app › My Flights › Tap to import from SimBrief; the OFP then appears in the Documents app) and start fuelling and boarding (Mass and Balance › Load Aircraft, or through GSX if you have it). Both take real time in the Fenix, so they run in the background while you carry on. Then get the airport information (ATIS), set up the radios and get your IFR clearance. Your clearance gives you three numbers you'll need later: the SID, the initial climb altitude and the squawk code.
- EFBLOAD FLIGHT PLAN
- FUELING AND BOARDINGSTART
- ATISCONFIRMED
- RADIO PANELSSETUP
- IFR CLEARANCERECEIVED
- BAROSET QNH
- FLIGHT DIRECTORSON
- INITIAL CLIMBSET
- SPEED / HEADINGMANAGED
- EFISCSTR, ARC, 10NM
Set the initial climb altitude on the FCU and leave speed and heading in managed (dots showing). On the EFIS, CSTR shows the altitude constraints on the navigation display, ARC gives the forward view, and a 10 NM range is right for the departure.
System checks
A quick look at the things that would stop you going. Brake accumulator pressure (you need it for the parking brake with no engines running), engine oil, crew oxygen, the oxygen mask test, and the ECAM STATUS page. STATUS should be clear. If it isn't, look the item up before you go any further.
- ACCU & BRAKE PRESSURECHECKED
- ENGINE OIL QUANTITYCHECKED
- CREW OXYGEN PRESSURECHECKED
- OXYGEN MASK TESTPERFORM
- ECAM STATUSCHECKED
Found a fault? That's what the MEL is for. Our A320 MEL guide explains how to tell whether you can still dispatch.
Start the APU
Fuel pumps on first, then the APU master switch, then START. The APU takes a minute or so. When it's running, AVAIL lights up green on the start button. Only then put the APU BLEED on, to supply air for the air conditioning now and the engine start later.
- FUEL PUMPSON
- APU MASTERON
- APUSTART
- APU BLEEDON (WHEN AVAIL)
Be patient: wait for the green AVAIL light before the APU BLEED. Selecting things before the system is ready is the most common startup slip.
Programme the MCDU
This is the big one, and the part most people find hardest. The order real crews use is DIFSRIP: DATA, INIT, F-PLN, SEC F-PLN, RAD NAV, INIT B and PERF. In the Fenix, most of it comes in through the AOC uplink from SimBrief. You then check it, add the secondary flight plan for an engine-out return, and enter the takeoff performance.
- DATACHECKED
- INIT ACOMPLETE
- F-PLNCOMPLETE & CHECKED
- SEC F-PLNENGINE OUT RETURN SET
- RAD NAVCHECKED
- INIT BLOADSHEET ENTERED
- PERF TAKEOFFCOMPLETE
It's too much to cover here, so it has its own guide: the Fenix A320 MCDU tutorial, key by key.
Before Start
Everything you need to be ready for the push. Fuel and takeoff data checked against the loadsheet, doors closed, APU running with its bleed on, and then external power off. You're now on the APU's generator. Set the squawk from your clearance, transponder to AUTO, parking brake set, thrust levers at idle, and the beacon on last. The beacon tells everyone outside that engines are about to start.
- FUEL QUANTITYCHECKED
- TO DATASET & REVIEWED
- MCDUSETUP COMPLETE
- WINDOWS & DOORSCLOSED, SLIDES ARMED
- FUEL PUMPSON
- APUAVAIL
- APU BLEEDON
- EXTERNAL POWERDISCONNECTED & OFF
- SQUAWKAS CLEARED
- TRANSPONDER MODEAUTO
- SEATBELT SIGNSON
- PARKING BRAKESET
- THRUST LEVERSIDLE
- BEACON LIGHTSON
Fenix tip: disconnect the GPU in the Fenix app's Ground Services page after you've switched EXT PWR off (GSX can do this for you with Auto Disconnect GPU on), otherwise the ground crew will be waiting on it when you ask for the push.
Pushback and engine start
Get your push and start clearance and start the push, then release the parking brake when the ground crew asks. When you start the engines depends on how you push:
- Using GSX: the ground crew tells you when it's clear to start engines. Start them then.
- Using the Fenix's own pushback (Ground Services page): nobody tells you, so it's your call. Start once the push is under way, or after it if you'd rather keep things simple.
Either way, start them one at a time:
- ENG MODE SEL → IGN/START.
- ENG 2 MASTER → ON. Watch the start on the upper ECAM: N2 rises, then fuel flow, then EGT.
- Wait until engine 2 is stable at idle. The start sequence finishes and the numbers settle.
- ENG 1 MASTER → ON, and the same again.
- Set the parking brake as soon as the tug stops, then push complete.
- PUSH & START CLEARANCERECEIVED
- PUSHBACKSTART
- PARKING BRAKERELEASED
- ENGINE MODE SELECTORIGN/START
- ENGINE 2 MASTERON
- ENGINE 2STABLE AT IDLE
- ENGINE 1 MASTERON
- ENGINE 1STABLE AT IDLE
- PARKING BRAKESET
- PUSHBACKCOMPLETE
Why engine 2 first? It's what most sims and simmers use, and engine 2 drives the yellow hydraulic system that the parking brake uses. Airbus has since changed its procedures around single-engine taxi, and airlines differ, so if you prefer engine 1 first, go for it. It's entirely your preference. Whichever you choose, one engine at a time means you're only ever watching one start.
You're running. What's next?
Both engines are stable at idle and you're on your own power. Next is the After Start phase: mode selector back to NORM, APU bleed and APU off, then flight controls, flaps and trim set for takeoff. All 21 phases are in the Fenix A320 checklist, from here to securing the aircraft at the other end.
Startup questions
How long does a Fenix A320 cold and dark startup take?
If you're new to the Fenix, allow 40 to 55 minutes from cold and dark to engines running, most of it spent on the MCDU. Once the flow is in your hands, 20 to 25 minutes is comfortable.
Why start engine 2 first on the A320?
Our checklist starts engine 2 first because that's what most simmers do and what most sim checklists use. Engine 2 drives the yellow hydraulic system, which the parking brake uses. Airbus has since changed its procedures around single-engine taxi, and real airlines vary, so starting engine 1 first is just as valid. It's entirely your preference.
Do I need the APU if I'm on ground power?
Yes, for the engine start. Ground power gives you electrics only. The engines need air to turn over, and in the Fenix that air comes from the APU bleed, so get the APU running and its bleed on before you start.
Is this updated for Fenix V3?
Yes. Every step was checked in the sim on Fenix V3 in November 2026. The flow order hasn't changed; what moved is on the EFB: your flight loads from Fenix app › My Flights, the OFP is in the Documents app, and takeoff and landing figures come from the new Takeoff and Landing apps.
Is this the official Airbus procedure?
No. It's a checklist written for flying the Fenix A320 in MSFS, in an order that works well single-pilot. It's based on standard A320 flows, but it isn't the Airbus FCOM or any airline's SOP, and it's for simulation use only.
Tick it off as you go.
Pre-Flight and Cockpit Preparation are free in the app, with the real Fenix flight deck to show you where the key switches are. Unlock all 21 phases for £9.99, once.